| Table Element |
Learn the meaning of and how to use the table element, which is an important block-level element.
Basics of Table (table element)
Let us create a basic table using HTML.
Please study the basic table which is explained below.
First of all, please make sure that you go through the textbook to learn how to create a table using HTML.
After that, please open “week07\ex1.html”, which you are using in this practice, on the Hidemaru editor (If it is already open, you do not have to reopen it), and make additional input of sample texts which use the element being discussed to the main body (i.e., the content of the body element) while referring to the samples below.
When you have finished adding the element, save the file and check the display on the Web Browser to understand the behavior of each element.
Table (table element, tr element, th element, td element, and caption element)
- Explanation of the element
-
You can use a table element to create a table. By the way, a table consists of a “cell”,
which is an independent item of the table; “row”, which is a horizontally lined up group of cells; and a “column”, which is a vertically lined up group of cells.
A table is to be formulated in the following order.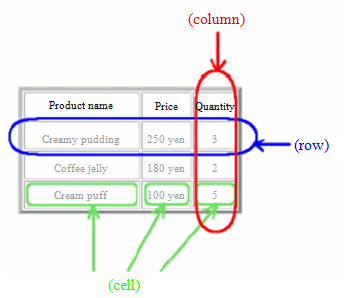
- First of all, input the table element which defines the whole table.
- If necessary, give a title (caption) to the table using the caption element. The caption element should be input right after the start tag of the table element.
- Next, input the tr element to specify the first row. The tr element defines the table row as a content of the table element.
- For the content of the tr element, input each cell contained in that row one by one from left to right using either the th element, which defines a table header cell, or the td element, which defines a normal table data cell.
- Once you have finished inputting the first row, define the next row by inputting another tr element and then input all the cells contained in that row from left to right in the same manner as the first row.
- The table will be completed when you repeat above operation in the number of row required.
The tr element cannot contain anything but an th element or td element; however, it should contain at least one th element or td element.
The th element and td element are block-level elements which can contain inline elements and/or texts. In addition, they can contain block-level elements as well.
- Sample HTML
-
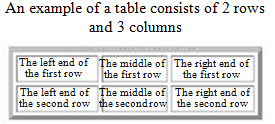
<table border="3">
  <caption>An example of a table consists of 2 rows and 3 columns </caption>
  <tr>
    <td>The left end of the first row </td>
    <td>The middle of the first row </td>
    <td>The right end of the first row </td>
  </tr>
  <tr>
    <td>The left end of the second row</td>
    <td>The middle of the second row </td>
    <td>The right end of the second row </td>
  </tr>
</table>
(Note) The start tag of the table element has an attribute “border=“3”. There will be a further comment at the bottom of this page. This is an attribute to draw a frame border for the table. There will be no frame border unless you input this attribute.
- The results displayed on the Web Browser
-
- Summary statement using the summary attribute
- It is recommended to add a summary of the table to the table element using the summary attribute. For the visually impaired, some “Audio browsers” can read out the attribute value of the summary attribute before it reads out the table content so that these people can confirm the significance of the content of the table, etc. in advance. However, on a normal Web Browser, the statement placed in the summary attribute is not displayed at all.
- Sample HTML
-
<table border="3" summary="Survey on the percentage of OS used for
privately-owned PCs. Conducted during a lecture at a certain university. The first row is the OS used, and the second row is
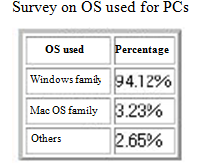
the percentage.”> <caption>Survey on OS used for PCs</caption> <tr> <th>OS used</th> <th>Percentage</th> </tr> <tr> <td>Windows family </td> <td>94.12%</td> </tr> <tr> <td>Mac OS family </td> <td> 3.23%</td> </tr> <tr> <td>Others</td> <td> 2.65%</td> </tr> </table>(Note) For the content of the tr element (“OS used” and “Percentage”) which defines the first row, the th element is used to input the cell. If you use the th element, the text is centered in the cell and displayed in bold.
On the other hand, if you use the td element, the text is left-aligned and displayed in standard fonts. - The results displayed on the Web Browser
-
Combining Cells in a Table
Let us combine cells to create a complicated table.
[Practice: Combining cells]how to combine cells in a table, which is explained below.
First of all, please make sure that you go through the textbook to learn how to combine cells in an HTML table.
After that, please open “week07\ex1.html”, which you are using in this practice, on the Hidemaru editor (If it is already open, you do not have to reopen it), and make an additional input of sample texts which use the element being discussed to the main body (i.e., the content of the body element) while referring to the samples presented below.
When you have finished adding the element, save the file and check the display on the Web Browser to understand the behavior of each element.
Combining cells (rowspan attribute and colspan attribute)
- Explanation of the attribute
-
You can combine two or more cells into one cell by specifying a rowspan attribute or a colspan attribute to the th element or the td element. The rowspan attribute combines cells vertically over two or more rows, and the colspan attribute combines cells horizontally over two or more columns. Either of the attribute requires the number of cells to be combined as its attribute value.
When you specify the rowspan attribute or the colspan attribute, you have to rearrange the number of cells (either the number of th elements or td elements) within the range where cells are combined. For example, if you specify “2” in the rowspan attribute, when you input the next row, as the cell which has just been combined has been already defined, you are to define one fewer cell in that row. - Sample HTML
-
<table border="3">
  <caption>  Simple table  </caption>
  <tr>
    <th> 11 </th>
    <th> 12 </th>
    <th> 13 </th>
  </tr>
  <tr>
    <th> 21 </th>
    <th> 22 </th>
    <th> 23 </th>
  </tr>
  <tr>
    <th> 31 </th>
    <th> 32 </th>
    <th> 33 </th>
  </tr>
</table>
If you want to modify this table in the following manner:、 ・To horizontally combine the second cell and the third cell of the first row, such as “1, 2-3”. ・And to vertically combine the second cell of the second row and the third row such as “2-3, 2”.
You have to change the HTML file as follows: The th element and td element that are no longer required because cells were combined together are replaced with an empty line for the sake of readability.<table border="3"> <caption> The table in which some cells have been combined </caption> <tr> <th> 11 </th> <th colspan="2"> 1,2-3 </th> </tr> <tr> <th> 21 </th> <th rowspan="2"> 2-3,2 </th> <th> 23 </th> </tr> <tr> <th> 31 </th> <th> 33 </th> </tr> </table> - The results displayed on the Web Browser
-
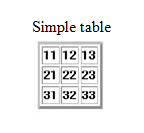

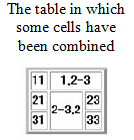
Table Formatting
Although the document design is basically outside the scope of the HTML, as HTML is a description language to specify the structure of the document, we will discuss a little bit of it here because, in relation to the table element, in many cases, a part of formatting has been done in HTML for historical reasons. We are going to study the detailed design later in the course.
Please study how to format a tablewhich is explained below.
First of all, please make sure that you go through the textbook to learn how to format a table in HTML.
After that, please open “week07\ex1.html”, which you are using in this practice, on the Hidemaru editor, and make an additional input of sample texts which use the element being discussed to the main body (i.e., the content of the body element) while referring to the samples presented below.
When you have finished adding the element, save the file and check the display on the Web Browser to understand the behavior of each element.
Frame border width (border attribute)
- Explanation of the attribute
- You specify the width of the frame border. The value should be specified as a pixel value.
- Sample HTML
-
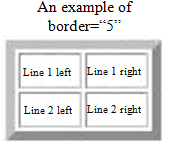
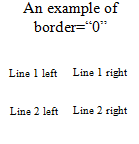
<table border="5">
  <caption>  border= An example of border=“5” </caption>
  <tr>
    <td>Line 1 left </td>  <td>Line 1 right</td>
  </tr>
  <tr>
    <td>Line 2 left </td>  <td>Line 2 right </td>
  </tr>
</table>
To remove the frame border, you either do not include a border attribute at all or set the value as border=“0”.
<table border="0"> <caption> An example of border=“0”</caption> <tr> <td>Line 1 left </td> <td>Line 1 right</td> </tr> <tr> <td>Line 2 left </td> <td>Line 2 right</td> </tr> </table> - The results displayed on the Web Browser
-
Cell spacing and cell padding (cellspacing attribute and cellpadding attribute)
- Explanation of the attribute
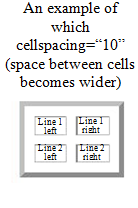
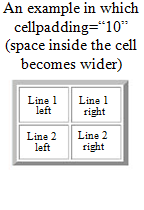
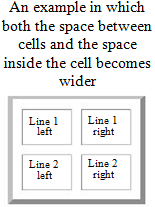
- Distance between the cell frame border and another cell frame border (cell space) is specified by the cellspacing attribute, and the distance between the cell’s frame border and the cell’s content (space in the cell) is specified by the cellpadding attribute. The value should be specified as a pixel value.
- Sample HTML
-
<table border="5" cellspacing="10" >
  <caption> An example in which cellspacing=“10” (space between cells becomes wider)</caption>
  <tr>
    <td> Line 1 left</td>  <td> Line 1 right</td>
  </tr>
  <tr>
    <td>Line 2 left</td>  <td>Line 2 right</td>
  </tr>
</table>
<table border="5" cellpadding="10"> <caption> An example in which cellpadding=“10” (space inside the cell becomes wider) </caption> <tr> <td>Line 1 left </td> <td>Line 1 right</td> </tr> <tr> <td>Line 2 left</td> <td>Line 2 right</td> </tr> </table><table border="5" cellspacing="10" cellpadding="10"> <caption>An example in which both the space between cells and the space inside the cell becomes wider </caption> <tr> <td>Line 1 left </td> <td>Line 1 right</td> </tr> <tr> <td>Line 2 left </td> <td>Line 2 right</td> </tr> </table> - The results displayed on the Web Browser
-
Position of cell content (align attribute)
- Explanation of the attribute
-
This attribute specifies the crosswise (horizontal) position of the data within the cell. Possible values include the following:
- Left (aligned to the left; this is the default value for the td element)
- Center (aligned to the center; this is the default value for the th element)
- Right (aligned to the right)
- Justify (justify the text)
- Sample HTML
-
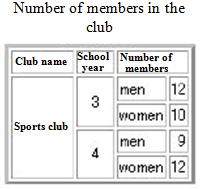
<table border="3"> <caption> Number of members in the club </caption> <tr> <th>Club name </th> <th>School year </th> <th colspan="2">Number of members </th> </tr> <tr> <th rowspan="4">Sports club </th> <td rowspan="2" align="center">3</td> <td>men</td> <td align="right">12</td> </tr> <tr> <td>women</td> <td align="right">10</td> </tr> <tr> <td rowspan="2" align="center">4</td> <td>men</td> <td align="right">9</td> </tr> <tr> <td>women</td> <td align="right">12</td> </tr> </table> - The results displayed on the Web Browser
-