
| Installation of Email Software (Seemit) |
Install Seemit.
(Note) Installation: copying a program to a PC and making it ready to use
Notes on Using Seemit
When you use Seemit in the University (when you use the PC in the training room during the lectures on Information Processing Fundamentals), information such as the mail address and mail server can be automatically set using the functions of Seemit.- Installing Seemit (using the PC in the training room in the University)
- Installing Seemit (outside of the University)
Installing Seemit (using the PC in the training room in the University)
Seemit is email software developed in the Center for Multimedia and Information Technologies of the University.
It is the first software that is specialized for information technologies education, and it has functions that are beginner-friendly and that help students to learn the mechanism of sending and receiving emails.
(Note) You do not necessarily have to install Seemit. You can perform most of the operations using the email software that you use every day.
Install Seemit in “My Documents”. (You may change the installation destination at your personal discretion.)
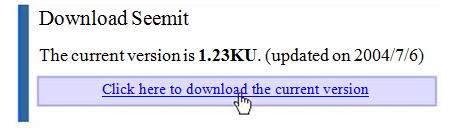
Seemit can be downloaded from here (http://seemit.info/KU/download/).
- Access the URI above (click the link above) and click “Click here to download the current version”, then save it on the “desktop”.

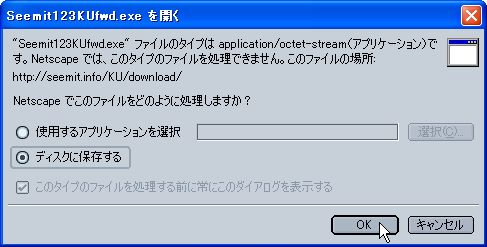
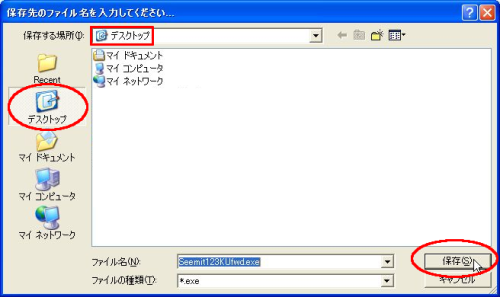
- Double click “Seemit123K…” you saved on the desktop, and confirm the destination to extract it in the window displayed then click “OK”.


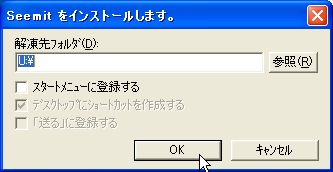
- The icon “Seemit” appears on the desktop, then double click it.

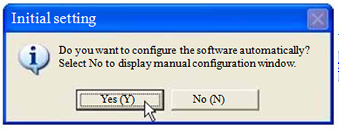
- After a while, you will be asked “Do you want to configure the software automatically?” then click “Yes (Y)”, and when a message “Configuration is completed!” displayed, click “OK”.

- We do not need “Seemit123K” on the desktop anymore, so put it to the Trash.

 [Movie] Installation (70 seconds) |
Click the image on the left to see the explanation movie with audio.
(to listen the audio, you need earphones.)
Here is how to install Seemit. First, click on the current version of the file (simple installer) on the Seemit download page. A window like this (select the location to save) appears, click “Desktop” then click “Save”. The icon “Seemit” appears on the desktop, then double click it. A dialogue like this (install) appears, then click “OK”. This is the end of the installation. You do not need the file you used to install it anymore, so you can put it to the “Trash”. Now the installation has been completed. |
Email Address and Configuration of Seemit
and the second half is called the domain part. They are all written in single-byte characters.
(*) In Seemit, when you display the email address enlarged, any double-byte characters in the email address are displayed in red.
Generally, when you use email software
you first need to configure information such as your email address or mail servers .
Seemit has a function to configure them automatically, therefore you can use it right away (Don’t you think this is convenient? (^_^)). In fact, we used it in 4. in the previous section.
(*) However, this function can only be enabled when using the PC in the training room.
Confirm your email address in the “Setting” of Seemit, and memorize it.
- Select “Setting” in the “Edit” menu of Seemit.
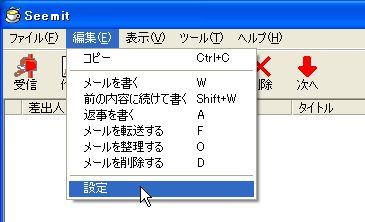
- Confirm the contents in the window displayed and memorize the email address.

Installing Seemit (outside the University)
Seemit is email software developed at the Center for Multimedia and Information Technologies of the University.
It is the first software that is specialized for information technologies education, and it has functions that are beginner-friendly and that help students to learn the mechanism of sending and receiving emails.
(Note) You do not necessarily have to install Seemit. You can do most of the operations using the email software you use every day.
Download Seemit.
You can download Seemit from:
http://seemit.info/download/(for the public)
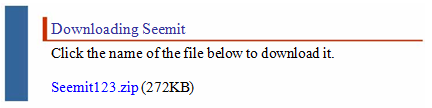
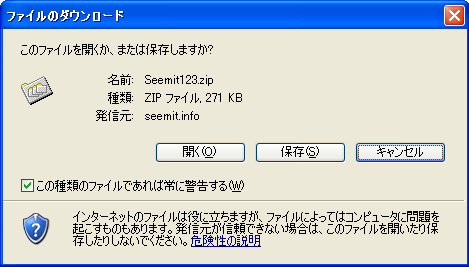
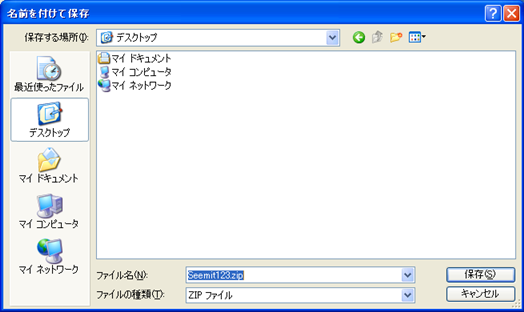
- Access the URI above (click the link above), and click “Seemit123.zip” to save “Seemit123.zip”.
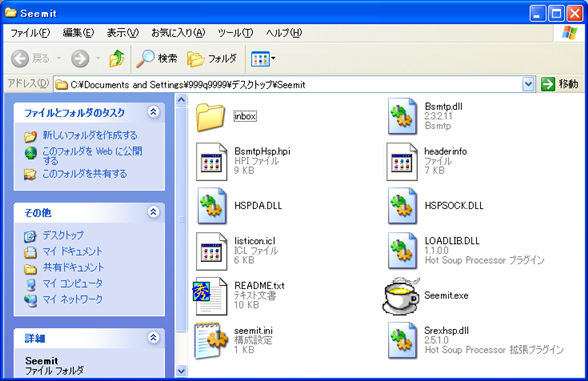
- Extract “Seemit123.zip” you saved, then a folder “Seemit” appears.
Email Address and Configuration of Seemit
and the second half is called the domain part. They are all written in single-byte characters.
(*) In Seemit, when you display the email address enlarged, any double-byte characters in the email address are displayed in red.
Generally, when you use email software
you first need to configure information such as your email address or mail servers.
Seemit has a function to configure them automatically, therefore you can use it right away (Don’t you think this is convenient? (^_^)).
(Note) However, this function can only be enabled when using the PC in the training room.
Configure Seemit.
- Execute the file Seemit.exe. The configuration window is displayed when you execute it for the first time, configure it with your email account and other information.
* You can modify it using “Setting” in the “Edit” menu.
- Enter your email address and information on the mail server, etc., in the window displayed.