
Reviewing the Execution of Application Programs and File Extensions |
How to Execute Application Programs
First, click here to display an image and make a right-click on the image to select “Save image as,” then save it on the desktop as “phone.jpg.” Next, practice how to execute application programs using various methods by following the instructions below.
As shown below, there are at least six methods of executing application programs, even if you only use the main methods.
- Enter the file name of the application program
- Double click on the icon of the application program
- Double click on the shortcut icon of the application program
- Select the application program from the “Start” menu
- Double click on the icon of a created data file
- Drag and drop the icon of a created data file onto an application program icon or its shortcut
Method 1 is the original method of usage in the PC system and is very useful, depending on how you use it. However, you need to enter text from the keyboard every time so it is not often used since people tend to avoid the bother of entering the name, except for administrators or specialists in PCs.
Now let’s give it a try to see how an application is executed using this method.
Select “Programs” from the “Start” menu and click on “Command Prompt” from “Accessories.” Enter in “Notepad” in single-byte characters in the window displayed and
press the Enter key.

You will see Notepad running. This method may be bothersome compared to double clicking on an icon. Generally, we do not use Method 1 to execute an application that can be operated using normal mouse functions. In fact, this method is more enjoyable and effective. However, that is a story for another day.
Next, execute an application program using Method 2.
(Note) If you have not installed GIMP, prepare it in your environment with reference to these instructions.
(GIMP is free image processing software and we will use it in Session 5. It is freeware, but is highly functional software even compared to commercial software)
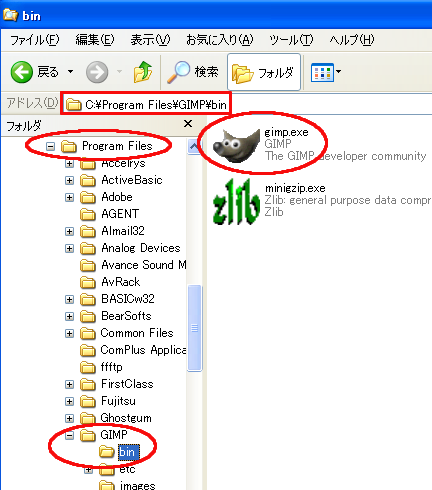
Execute “Explorer” and click C:/Program Files/GIMP/bin in the pane on the left. Actually, clicking the icon of each folder in the pane on the left opens the folder and you can enter it. Then, find gimp.exe in the pane on the right. This is the “actual file” of GIMP that you executed from the “Start” menu.
Now, double click on it to confirm that GIMP is executed.
Next is Method 5.
Many of you may have already used this method to execute an application program, however, do you really understand the mechanism of this method?
You can use this method owing to the fact that Windows OS is creating a link between file extensions and application programs. A more detailed explanation will be provided in the next section.
Pay attention here to the difference between Method 5 and Methods 1-4:
- You execute the application program which is linked to the file that you double clicked,
- The application that is executed loads the file
The last is Method 6.
“Drag and drop” is an operation to drag an icon of the file (data file) that needs to be moved and releasing (dropping) it on another icon. In this case, you have to release it on the icon of an application program (or its shortcut).
This method is similar to Method 5, but it is more flexible as you can execute another application program that is not linked to the target file and load the data by using it.
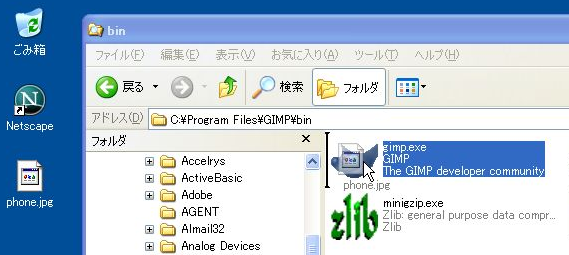
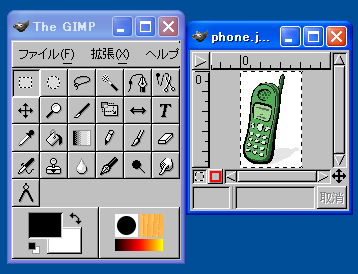
In the example below, a file “phone.jpg” is dragged and dropped onto gimp. Then, gimp is executed and displays phone.jpg. If you just double click on phone.jpg (Method 5), phone.jpg is displayed using the application program that is linked to the file extension “.jpg.”

By using this method, you can specify the desired application program to open the data file.
File Extensions and Application Programs
Change the link between the file extension and application program and confirm how it changes by following the instructions below.
File extensions are categorized into the following two types.
- File extensions for which the OS specifies the operation
- File extensions for which the application programs specify the operation
The former are identified as “exe” “com” “bat” etc., which are attached to programs that can be executed by the OS right away.
On the other hand, the latter are attached to data files that are created or are to be loaded by the programs above. They are specified by the application program or the type of the data file, and there are many types of these.
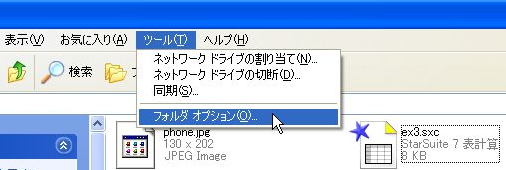
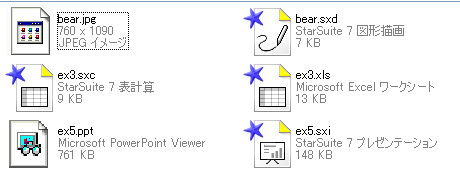
The latter file extensions are linked to application programs by Windows. You can confirm this by clicking on the “File type” tab in the “Folder Options” from the “Tools” menu in Explorer.
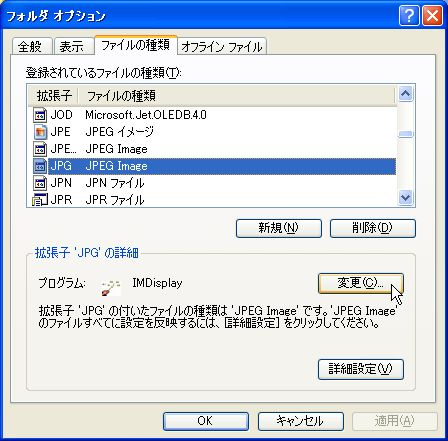
In the figure above, you can see a file extension “JPG” (there is no difference between lower case and upper case) is linked to IMDisplay. Thus, if you double click a file with a “JPG” extension, IMDisplay is executed and the file is loaded and displayed by IMDisplay.
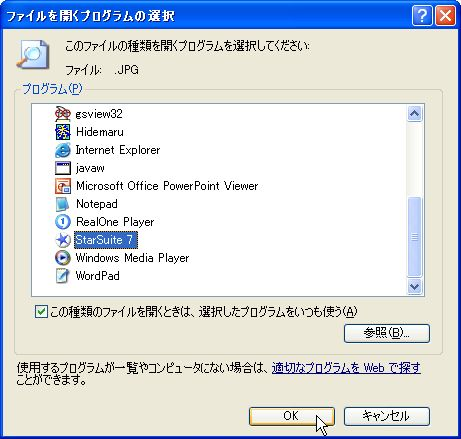
As a matter of fact, in this window you can change the link by clicking the “Change” button.
(Note) Substitute the explanation below appropriately for your actual environment.
For example, if you click the “Change” button and select “StarSuite7” in the displayed dialog, files with the “JPG” extension are linked to StarSuite, after this, double clicking a file with a JPG extension executes StarSuite and the file is loaded by doing this.
(Note) After carrying out the operation above and confirming how it works, restore the link of the “JPG” extension to its original state. Without doing this, the icons for the file and the application that is linked to the file remain different from each other, which would be inconvenient.
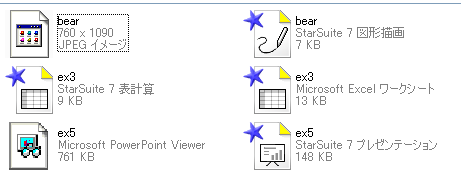
By the way, on your PC, are the file extensions displayed?
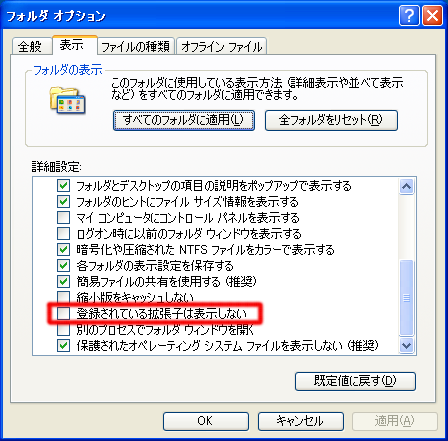
In the default setting for Windows XP, file extensions are not usually displayed. It is recommended that you display the file extensions for safety reasons.
To do this, select the “Display” tab in the “Folder Options” from the “Tool” menu in Explorer and uncheck “Hide file extension for known file types.”
Then, the file extensions that were not displayed before will appear.
(Note) You never know what will happen if you double click on an unidentified type of file attached to an email or that is downloaded from the internet without taking this precaution.

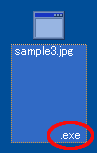
In the image on the left, the file extension seems to be “jpg” (there is a strange symbol on the bottom, but usually we do not notice it), but when you click it, it turns out that there is “exe” (a file extension for application programs), the genuine file extension, is hidden after a long blank as in “sample3.jpg?????????? .exe”. ?A file such as this will always be a malicious program.? Never double click on such a file.