
| Basic Edit of Images by GIMP |
[The purpose of this section]
Learn the basics to edit an image using the Painting software [GIMP].
Learn the basics to edit an image using the Painting software [GIMP].
Once an image is created, it can usually be edited to further improve its quality. Here you will learn the most basic techniques.
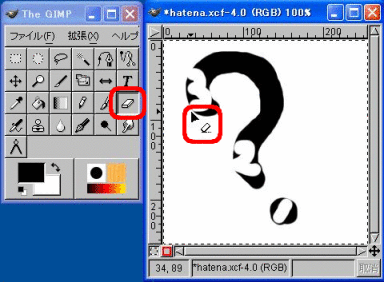
Eraser
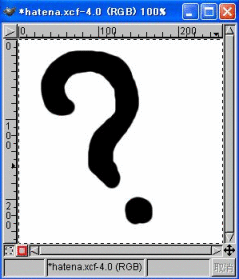
When you select the “Eraser” tool and drag or click, you can erase the specified portion.
By selecting the appropriate “Brush,” you can change such items as width of the Eraser.
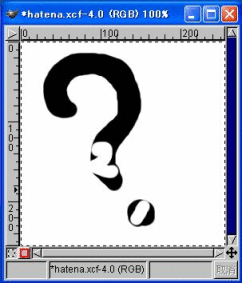
★ Example of using “Undo”
Using the “Undo function” explained in the previous section, which is to press “z” while holding the Control key, you can restore the previous state. You will find this helpful when you have erased too much.
The figure below is the result of executing “Undo” from the figure above. You can see that the portion erased last by the “Eraser” has been restored.

By selecting the appropriate “Brush,” you can change such items as width of the Eraser.
★ Example of using “Undo”
Using the “Undo function” explained in the previous section, which is to press “z” while holding the Control key, you can restore the previous state. You will find this helpful when you have erased too much.
The figure below is the result of executing “Undo” from the figure above. You can see that the portion erased last by the “Eraser” has been restored.
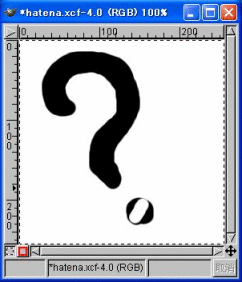
If you repeat this process by pressing “z” while holding the Control key (which is “Undo” function), you can further go back to the further previous state. The figure below is the result of “Undo” twice from the above figure.
Area Selection
When you select the area selection tool, you can specify the area where you wish to apply some operation. When an area is selected, the area is displayed by a blinking dotted line enclosing the area. By selecting an area, the functions such as “Daub” and “Copy & Paste” are enabled.
In editor and word processor software, just dragging the mouse can select a group of characters. In the case of an image, however, an area can only be selected by specifying the dedicated tools.
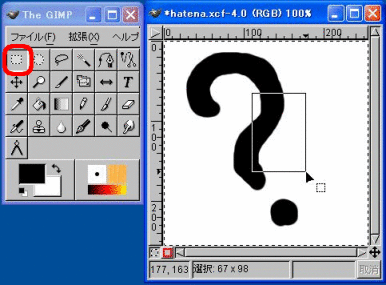
When “Select rectangle” tool is selected and an area is dragged, you can specify the rectangular area as the object of operations.

(*) When you apply some operation outside the selected area, perform “Release area selection” first.
“Release area selection” can be done, either by right clicking on the painting area to pop up the menu and then selecting “Select” → “None,” or by using some area selection tool (such as the “Select rectangle tool” or “Select circle tool”) and then clicking on any area outside the selected area.
In editor and word processor software, just dragging the mouse can select a group of characters. In the case of an image, however, an area can only be selected by specifying the dedicated tools.
When “Select rectangle” tool is selected and an area is dragged, you can specify the rectangular area as the object of operations.
(*) When you apply some operation outside the selected area, perform “Release area selection” first.
“Release area selection” can be done, either by right clicking on the painting area to pop up the menu and then selecting “Select” → “None,” or by using some area selection tool (such as the “Select rectangle tool” or “Select circle tool”) and then clicking on any area outside the selected area.
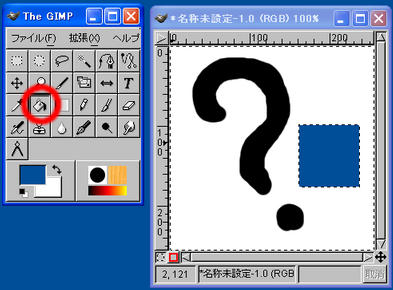
Daubing an Area
When selecting the “Daub” tool while an area is selected, and then clicking on the area, the area will be daubed by the foreground color.
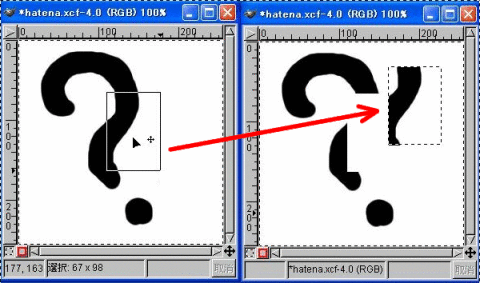
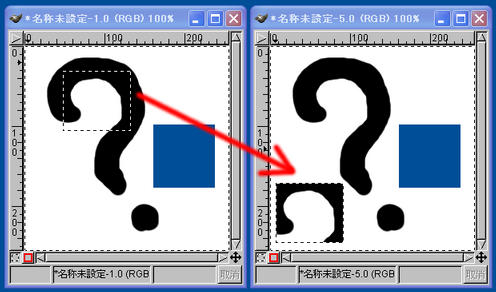
Moving an Area
When an area is selected and, in that state, it is dragged, the area will be moved.

Copy & Paste
When area selection is used, you can perform Copy & Paste.
- Select an area where you wish to copy, by using the area selection tool.
- Right click on the painting area to show the menu; select “Edit”→ “Copy” (or press “c” while holding the “Control” key), to save the original for subsequent copying. This, however, does not result in any change in the view.
- Right click on the painting area to show the menu; select “Edit”→ “Paste”, (or press “v” while holding the “Control” key), to perform pasting. However, since the pasting is done at the same selected area, this does not create any visible difference.
- Then the area under the area selection state is dragged to the desired position.
- Click on any area outside the selected area, to fix the process. (The dotted line around the selected area disappears.)
Character Input
Selecting the “Character” tool will enable the input of characters in the image.
- Select the “Character” tool from the Toolbox. (This alone does not create any difference.)
- Click on the painting area.
Then the “Character tool” window is opened. In this window, enter the string of characters you wish to display in the image to the preview area, and then select the font (character type), font size, and so on.
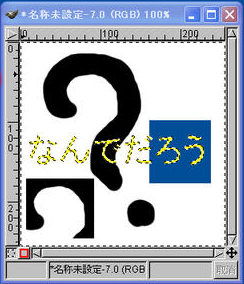
- Since the entered string of characters is displayed in the area selection state, move the mouse pointer to the characters, confirm that the mouse pointer changes to “+ mark with arrow,” and then drag the selected area to the desired position.
(*) Note that if you attempt to drag before the mouse pointer changes to “+ mark with arrow,” the “Character tool” window will be opened again.
- Right click on painting area to show the menu, from which you then select “Layer” → “Fix layer,” to fix the character string. (You can also fix the string by selecting the area selection tool and by clicking on any position other than that of the characters you just wrote.)
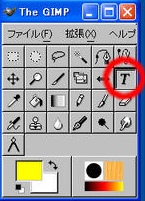
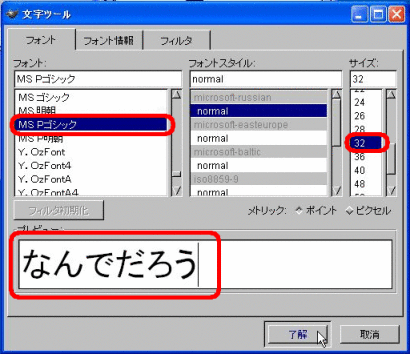
(*) If you wish to display Japanese characters, select Japanese fonts, such as “MS P Gothic.”
(*) The fonts with “@” at the top are the fonts for vertical writing.
(*) Since “Layer” is an important concept in the Painting software, we will learn more in the next section.
Exercise for How to Use Edition Functions
[Practice 3]
Save the “exl.xcf” that you created in Practice 2 to a file with a name “ex2.xcf” in the same folder. Enter some characters, apply some changes in the image by using editing functions, and finally overwrite save it.
Save the “exl.xcf” that you created in Practice 2 to a file with a name “ex2.xcf” in the same folder. Enter some characters, apply some changes in the image by using editing functions, and finally overwrite save it.