
| Box Model |
Study the box model of the CSS which controls the margins and borders of the HTML blocks.
Basics of Box Model
In CSS, a rectangular area created for each HTML element such as the one in the image below is called an “element box” or simply a “box”.
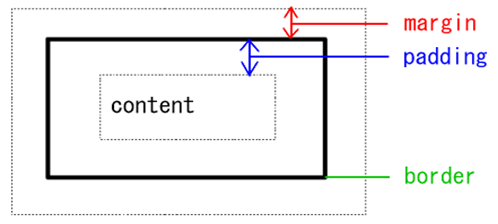
As shown above, the element box has four areas, and the meaning of each is as follows:
- The content of the HTML element
- Padding is the space between the HTML content and the border
- Border is the frame border
- Margin is the space between the border and other HTML elements
These three; i.e., padding, border,margin are properties (setting items) of each selector (HTML element name, class name, etc.) of the CSS. Therefore, by specifying these properties for each selector, you can do a variety of things, including setting the margin between the blocks which represent the HTML elements and encircling the block with a frame border.
Let us set properties for the p selector (p element) and see how the display style changes.
Space created by the margin property
Let us set margin to 10px. With regard to the following p.box1 selector, please make the 、 border (frame border) be displayed in red and have a thickness of 1 px,thereby making it easy to see that the (p) element consist of boxes. In addition, please set the padding to zero(0px) so that you can see the difference in meaning between the margin, which creates the space, and padding.
p.box1 {
  margin: 10px;
  padding: 0px;
  border: 1px solid red;
}
When you set a style using the p.box1 class selector as shown above and use it in HTML as shown below,
<p class="box1">
  This is a p element block for which the class name is “box1”.
</p>
the display on the Web Browser will be as follows:
This is a p element block for which the class name is “box1.”
To make it easy to understand, we color the margin area in “ ”, then it becomes as follows:
This is a p element block for which the class name is “box1”.
As the area outside the red border is the margin area, you can see that space as wide as 10px ,which is the value of the margin property, is created in all directions.
By the way, the width of the box (width of the outside frame of the margin) is set to the width of the Web Browser (strictly speaking, the width of the surrounding parent block), regardless of the length of the content of the HTML element. In the image above, the width of the box is the width of the whole area up to and including the outside areas to the left and right which are colored in “ ”.
For this reason, the vertical border (frame border) is drawn toward the outside frame of the browser to the left and right, leaving just a margin width’s of distance between them, rather than immediately outside the content of the p element.
Now, let us apply the p.box2 below, for which the value is changed to 30px, to the HTML to help you fully understand the meaning of the margin property. The values of other properties of the p.box2 are the same as that of the p.box1 selector. However, please note that the content of the p element of the HTML, to which we apply this style, now has more characters than the example above.
p.box2 {
  margin: 30px;
  padding: 0px;
  border: 1px solid red;
}
<p class="box2">
  This is a p element block for which the class name is “box2”
and the margin is set to 30 px.
All other settings are exactly the same as those for p.box1.
</p>
This is a p element block for which the class name is “box2” and the margin is set to 30 px. All other settings are exactly the same as those for p.box1.
Please confirm that a space of 30 px has been created between the outside frame and the border in all directions because the value of margin property of the p element is changed to 30 px. In addition, as the content of the p element has been increased, the lines are broken automatically inside the border.
■ Space created by the padding property
This time, to confirm the effect of the padding property, let us set the value of padding property to 10px for the p.box3 selector below. All other properties are exactly the same as those for p.box2 property.
p.box3 {
  margin: 30px;
  padding: 10px;
  border: 1px solid red;
}
When you set the style using the p.box3 class selector as shown above and use it in HTML as shown below,
<p class="box3">
  This is a p element block for which the class name is “box3”,
the margin is 30 px, being left as is, and the padding is set to 10 px.
All other settings are exactly the same as those for p.box2.
</p>
on the Web Browser, this will be displayed as follows:
If you use nothing but the CSS above, it is not possible to put a color here.
This is a p element block for which the class name is “box3”, the margin is 30 px, being left as is, and the padding is set to 10 px. All other settings are exactly the same as those for p.box2.
As the area between the red border and the characters inside it is the padding area, you can see that space as wide as 10px, which is the value of the padding property, has been created in all directions.
■ Frame border created by the border property
Although the frame border is not usually drawn, you can do that by setting the border property. As for the value, you specify three values; i.e., “thickness (width)”, “ 「style”, and “ color”, either in color code or by the color name, separated by one single-byte white space.
Now, let us draw a thick red frame border. We specify the “thickness (width)” to be 20pxand the “color” to be#f33 (slightly light red).
p.box4 {
  margin: 30px;
  padding: 10px;
  border: 20px solid #f33;
}
When you set the style using the p.box4 class selector as shown above and use it in HTML as shown below,
<p class="box4">
 This specifies a border in which the thickness is set to “20 px”,

 the style to “solid”, and the color to “#f55”, while leaving

 the same margin and padding as in p.box3 (30 px and 10 px respectively).

 You can see that a thick red frame border has been drawn, can’t you?
</p>
on the Web Browser, this will be displayed as shown below. A border of 20px width is drawn in slightly light red, isn’t it? Please also confirm that the border is inside the margin area and outside the padding area.
This specifies a border in which the thickness is set to “20 px”, the style to “solid”, and the color to “#f55”, while leaving the same margin an padding as in p.box3 (30 px and 10 px respectively). You can see that a thick red frame border has been drawn, can’t you?
By the way, for border “style”, you can specify one of the following ten border styles.
dashed double ridge outset
Box Model and Background Color
In the last session, we set the background color using the background-color property of the body selector, didn’t we? This property is not exclusive to the body selector, but can be applied to all CSS boxes.
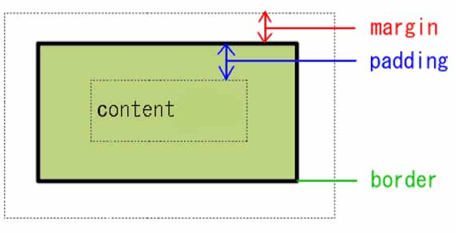
Actually, the color specified with the background-color property will become the color of the padding area as well as the content area in the box model. In other words, the whole area inside the border (the border is not included) is colored as shown in the image below.
Now, for the purpose of experiment, let us try to set a background color to the p element. Let us just add background-color to the p.box4 selector we used above to define the p.box5 selector as shown in the example below. The background color I selected is color code #8bf.
p.box5 {
  margin: 30px;
  padding: 10px;
  border: 20px solid #f33;
  background-color: #8bf;
}
When you set the style using the p.box5 class selector as shown above and use it in HTML as shown below,
<p class="box5">
  I tried to set the value of the background color property to #8bf.
</p>
on the Web Browser, this will be displayed as shown below. Although it is a bit hard to see because the border is thick and red, you can see that a deep light blue (#8bf) background color is set to the padding area as well as the content area inside the border, can’t you?
I tried to set the value of the background color property to #8bf.
In this way, using CSS, you can set different background colors to each element independently.
Property of Each Side of the Box
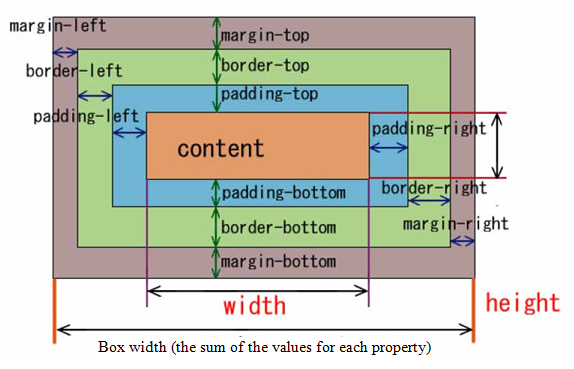
So far, with regard to the properties which define the style of the element box, we have been setting all sides of the box in a batch. Actually, as there are such properties that can be applied to each side of the box as shown in the image below, it is possible, using such properties, to set one of the properties to one of the sides.
Although it’s not a good example, it is possible to encircle the content with a border (frame border) like the one shown below.
Encircled by a strange frame border, isn’t it?
The image above is the display of the following HTML description on the Web Browser. The definition of the p.strangebox selector used there is shown below the HTML document. Individual values are assigned to the properties related to the purpose-made border for each side.
<p class="strangebox">
   Encircled by a strange frame border, isn’t it?
</p>
p.strangebox {
  margin: 10px;
  border-top:     2px dotted green;
  border-right:   0px none   white;
  border-bottom:  3px dashed red;
  border-left:   20px solid  purple;
  padding: 10px;
  background-color: #8bf;
}
Setting the Width of the Whole Element Box Using Width Property (Setting the Height Using the Height Property)
All the explanation so far assumed that “regardless of the length of the content of the HTML element, the width of the element box is automatically adjusted in a such way that the width of the Web Browser becomes the width of the box”. Therefore, the width of the box (the very outside of the box) was always fixed. This is because we have not set the width property, shown in the image above.
Now, let us set the width property. Adding the width property to the content of the p.box1 selector, which was used as the first example of the box model, let us define the p.box1width as follows:
p.box1width {
  margin: 10px;
  border: 1px solid red;
  padding: 0px;
  width: 250px;
}
When you set the style using the p.box1width class selector as shown above and use it in HTML as shown below,
<p class="box1width">
  This one is displayed using the “box1width” class for which the width

  property has been set.Please confirm that the width of the box is now small.
</p>
on the Web Browser, this will be displayed as shown below. You can see that the width of the box is now small, can’t you?
This one is displayed using the “box1width” class for which the width property has been set. Please confirm that the width of the box is now small.
You are great if you thought, “Hang on??? Isn’t it just that the right margin became larger?” For sure, it looks like that. However, we set the margin to 10 px in all directions when we set up the p.box1width selector, didn’t we?
Then, to make it easier, let us put some color to the margin area. Then, it becomes like the image below.
This one is displayed using the “box1width” class for which the width property has been set. Please confirm that the width of the box is now small.
It is that the box of the p element does not go beyond the colored area. (Please confirm that the right margin is also 10 px.) It was that the area beyond the colored area on the right was the margin which had nothing to do with the p element.
In other words, it was that the width of the whole box became smaller because we set the width of the content area where the text is displayed (to 250 px) using the width property.
As you have realized from this example, actually, the width of the whole box including the margin area is determined as follows:
Once again, the reason why the width of the whole box before this section was always the same as the width of the Web Browser is that the width property was not set.
(Note) In the same manner as for the width of the whole element box, the height (vertical length) of the whole box can be set using the height property. The height of the box is determined by the following formula: