
| Relationship between Boxes and Creation of a Box |
Study the relationship between CSS boxes and how to control the location as well as how to create a new box
Parent Element Box and Child Element Box
So far, I have discussed the case where an element box exists on its own; however, what happens if there are a parent element and a child element?
Element boxes which are in a parent-child relationship are as shown in the image below.
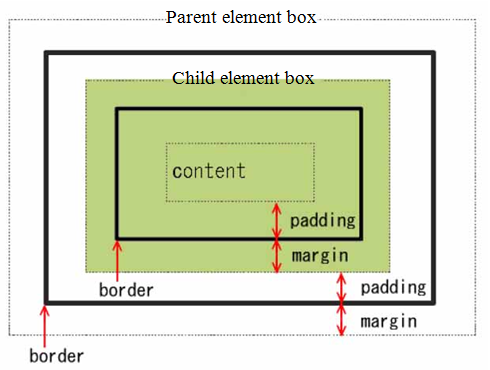
As you can see from the image above, the child element box is in the parent element box as the content. (The colored area in the image above is the content area of the parent element box.)
By the way, as I have stated above, all the elements which seem to be there independently are actually a child element of the body element. In addition, the content area of the body element is virtually the same as the width of the Web Browser, because the margin and padding of the body element box are automatically set to small values. For this reason, every element (a child element of the body element) is, unless you set the width, displayed almost as large as the width of the Web Browser screen.
Layout of the Block-level Element and the Inline Element
So far, we have been studying the characteristics of the element box and how to set it up. However, actually the explanation up to this point is only concerned with the boxes of block-level elements, which are the basic components of the HTML document.
Although the inline elements also have exactly the same boxes, the layout on the browser is slightly different, because the inline element is a child element of the block-level element.
The image below shows an example of layout where there are block-level element boxes and inline element boxes. The block box is the box the block-level element creates, whereas the inline box is the box the inline element creates.
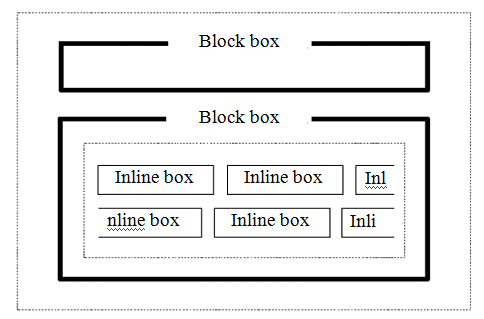
As seen in the image above, inline boxes are arranged in such way that they are cast into the content area of the block box which is the parent element containing them. Because of this, if required, the line is automatically broken and multiple lines are automatically created.
Adjustment of the Margin between Element Boxes in the Box Model
It seems that there is no difference between margin and padding in terms of creating a margin in a normal box where a borderline is not drawn. However, as you can see the difference when you put a background color using background-color property, we use the margin and padding for intrinsically different reasons.
One of the most important roles of the margin property is to set the space between element boxes. You use margin-top and margin-bottom property to set the space between the boxes.
Now, let us display two p elements using the p.box1 selector which we defined at the beginning. The p.box1 selector we defined previously is shown below, just in case.
p.box1 {
  margin: 10px;
  border: 1px solid red;
  padding: 0px;
}
When the following two p elements are displayed on the Web Browser,
<p class="box1">
  This is a p element block for which the class name is “box1”.
</p>
<p class="box1">
  Although this is also a p element block for which the class name is “box1”, this is

  displayed in a separate box, because this is a different p element from the line above.
</p>
it will look as follows:
This is a p element block for which the class name is “box1”.
Although this is also a p element block for which the class name is “box1”,
this is displayed in a separate box, because this is a different p element from the line above.
When you saw the image above, did you realize that the margin between the top box and the bottom box is the same as the margin to the parent element (10 px)? Please confirm that it is not the total of the two margins (20 px).
Actually it has been arranged that either the margin-bottom of the top box or the margin-top of the bottom box, whichever the larger, is the margin between two block boxes.
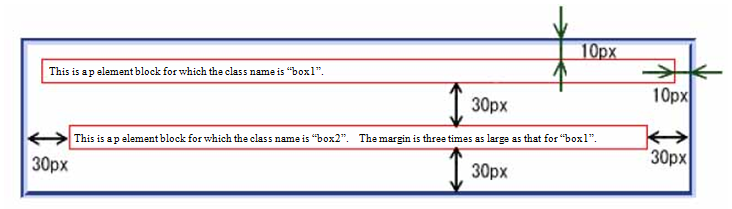
In order to confirm this, let us display two block boxes which have different margin values. The p.box2 selector defined below is exactly the same as the p.box1 except that the value of the margin is 30 px, three times as large as the p.box1.
p.box2 {
  margin: 30px;
  border: 1px solid red;
  padding: 0px;
}
When we create the following HTML using the p.box2 above and the p.box1 defined previously,
<p class="box1">
This is a p element block for which the class name is “box1”.
</p>
<p class="box2">
This is a p element block for which the class name is “box2”.

The margin is three times as large as that of “box1”.
</p>
When displayed on the Web Browser, it will look like as follows:
This is a p element block for which the class name is “box1”.
This is a p element block for which the class name is “box2”.
The margin is three times as large as that of the “box1”.
The image below is the same as the image above, except that a few remarks are inserted to show the sizes of the margins. As you can see from this image, the margin between the two blocks is 30 px, the larger value of the margin-bottom of the top box (10 px) and the margin-top of the bottom box (30 px). (Please note that this image is slightly scaled down.)
The distance between the lines in the content area (i.e., the margin between lines) is determined by the line-height property, which decides the height of the line and the size of the characters.
Creating a New Box ? div Element and span Element
So far, using the p element as a sample, I have explained how to make settings of the CSS. However, in the same manner you can make settings for not just the p element, but any HTML element. By the way, the scope of the explanation up to this point does not include how to set/modify the style for two or more different HTML elements at one stroke or for just a part of a certain element.
To do such things, you need grouping elements, div element and span element. (Please make no mistakes; these are HTML elements, not CSS elements.)
Actually, in Session 7, a brief explanation of grouping elements (div element and span element) was given. Do you remember that? At that time, I explained them as follows:
Basically CSS sets up the presentation of a block unit which is described by HTML. However, sometimes you want to set up the presentation of a unit (block) which is different from the block defined for the structure of the document. In that case, you can use grouping elements such as the div element and the span element. 。
The div element is a block-level element and can include all elements. On the other hand, the span element is an inline element and can only include text or inline elements.
Then, let us set a style using the div element and the span element.
First of all, let us set a style. This time, let us define the style using the universal selector so that we can deal with not just the div element and the span element but other elements as well. (Of course, you can make it div.haikei selector or span.mgn selector when you make definition.)
.haikei {
  margin: 15px;
  padding: 5px;
  width: 450px;
  background-color: #cfd;
}

.mgn {
  color: blue;
  font-size: 1.2em;
  padding-left: 5px;
  padding-right: 5px;
  background-color: #fcc;
}
For the .hiakei selector, we set width specifying the width of the display (450 px) as well as the background color (#cfd). For the .mgn selector, we set the color (blue) and the size (1.2 em) of the character, padding to the right and left (5 px), and the background color (#fcc).
Here, let us use the div element to “group together the areas which contain multiple p elements and set the width of the display and background color for the group”. In addition, we use the span element to “change the size and color of the character as well as the background color in relation to the word ‘margin’”. Let us apply the universal selectors we defined above to these two HTML elements. The source HTML to which these are applied is the sample we used at the end of the last section.
The following shows the HTML file to which these selectors have been actually applied:
<div class="haikei">
  <p class="box1">
This is a p element block for which the class name is “box1”.
  </p>
  <p class="box2">
  This is a p element block for which the class name is “box2”.  The
    <span class="mgn">margin</span>is three times as large as that in the “box1”.
  </p>
</div>
When displayed on the Web Browser, it will look as follows:
This is a p element block for which the class name is “box1”.
This is a p element block for which the class name is “box2”.
The
marginis three times as large as that of the “box1”.
The area in which the background color is pale light blue (#cfd) is the content area of the div element. Since the width is set to 450 px, the width of the two p elements is now smaller than before, isn’t it?
In addition, in relation to the word "mergin" in the second p element, you can see that the size (1.2 times as large) and the color (blue) of the character and the background color (#fcc i.e.; pale pink) have been changed. This is the content area in the span element.
As you can see from these examples, the main purpose for us to use the div element and the span element is to use them as a class selector of the CSS to set a uniform style to multiple block-level elements (div element) or to set the same style to text and multiple inline elements (span element). From now on, using these elements, you can set styles to various areas, can’t you?