
| Upload to the WWW Server |
Learn how to publish a Web page by sending (uploading) the Web page files such as HTML files you have created to the server.
Uploading the Web Page Related Files
As, in the previous chapter, you have completed the preparation for uploading (this means “copying the files on your PC to the server”, doesn’t it?) your files to the WWW Server, all you have to do now is to actually upload them.
As upload means to copy a file from one machine to another, you follow the steps below to achieve that via WinSCP.
- Specify the upload (copying) destination folder.
- Select the source file to be uploaded (copied).
- Implement upload (copying).
Step 1 can be done after step 2. However, I would recommend you to specify/confirm the destination first, then do uploading because, through my experience doing this practice, I know that students tend to forget to specify the upload destination.
Please follow the steps below to upload the HTML files via WinSCP to the WWW Server.
Please never make a mistake when you specify the upload destination.
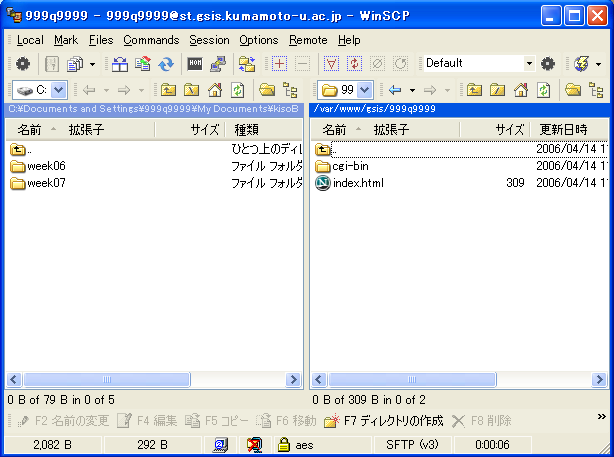
- Connect to the WWW Server via WinSCP
If you are already connected to the WWW Server via WinSCP, you will be all right. However, if you have not started up WinSCP or even if you have WinSCP up and running, you have no established connection to the WWW Server, please refer to the previous chapter to establish a connection to the WWW Server. - Specify the upload destination folder (moving to the destination folder at the WWW Server side)
As has been explained above, the upload destination must be public_html, which is the special folder dedicated for Web page publishing. Therefore, you are required to move to public_html on the server side pane located on the right hand side of the WinSCP window.
To move to the folder, all you have to do is to double click on the folder icon as you have been doing all the time. When you double click on the icon displayed as public_html, there will be a display as the image below.
- Select the source file to be uploaded (copied)
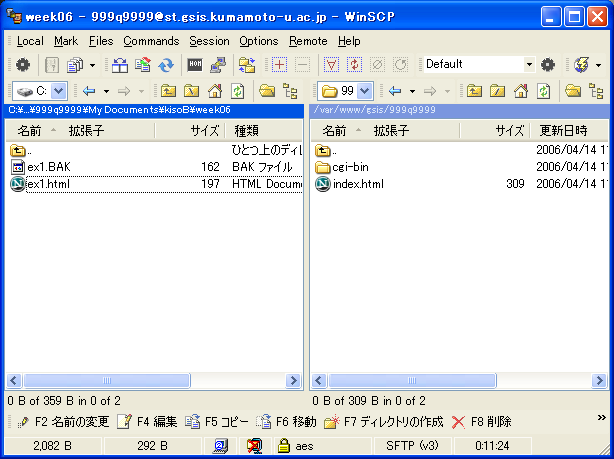
Next, please specify on your PC the relevant files for the Web page you created; i.e., the files you want to upload to the WWW Server. All you have to do is to move to the required folder by double clicking on the folder icon and click on the file in the same manner as you have done at the server side (or in fact as you have been doing all the time). However, as the objects of the operation this time are the folders and files located at the PC side (sometimes called “local side” as opposed to the server which is located at the other end of the network), you must do this operation on the left pane.
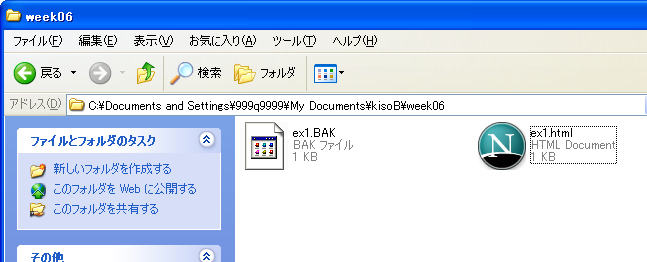
As you are supposed to upload week06\ex1.html this time, please move to the week06 folder that you have created in Session 6. (Please make sure that the week06 folder is displayed at the top part of the left pane.)
- Implement uploading
Drag ex1.html (week06) on the left pane to the right pane (public_html). Then the following window will be displayed. On this window, click “Copy” to upload the file.
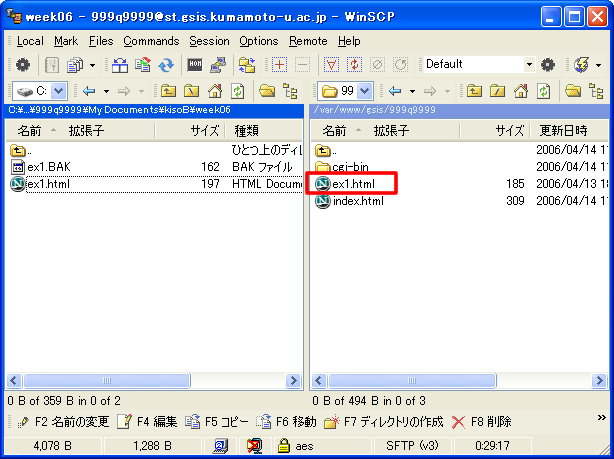
When the upload is completed, ex1.html, which has been uploaded to the server, will be displayed on the right pane. Upload is now completed.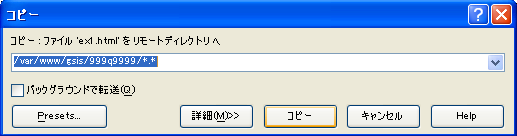
Checking the Display on the Web Browser
Let us check if the Web page you created has been successfully published as required. Sometimes, even if the Web page consists of just one HTML file, you cannot display the file properly because of problems associated with the location (folder) you stored the file or the file name.
Please follow the steps below to see if the HTML files you uploaded are displayed properly on the Web Browser (i.e., whether they have been successfully published).
If they are not displayed correctly, please work out the reason for the problem so that you can deal with the problem.
-
Please input the following URI in the address bar of the browser. Then press the Enter Key 、
to see if the Web page which you have just uploaded can be displayed.
http://st.gsis.kumamoto-u.ac.jp/user-ID/ex1.html
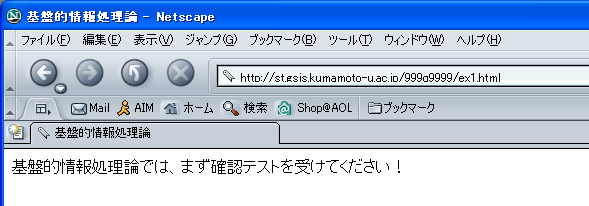
In the image above, the user ID is 999q9999.
If you could not display it properly, please check the following items again.
Error message Cause Things to be checked Cannot find … , please check the domain name again Entering a wrong server name in the URI Check if the server part of the URI you entered in the address bar of the browser is st.gsis.kumamoto-u.ac.jp. Not Found
The requested URL /~xxxx/yyy.html was not found on this server.Entering a wrong path name in the URI Check the path part (user ID or file name) of the URI you entered in the address bar of the browser. As above Upload to a wrong folder Check if the destination folder you uploaded via WinSCP is public_html or located below that level. As above Uploaded a wrong file Check if the file you uploaded via WinSCP has the same file name as the one in the URI which you entered in the address bar.
Please follow the steps below to understand the difference between the Web page which has been published and the Web page on your PC (which has not been published yet).
Please recognize the difference between the display on the Web Browser of the HTML file which has been uploaded and the display on the Web Browser of the HTML file which is located on you PC so that you can tell that what you are seeing now is either the one or the other.
-
Double click the week06\ex1.html icon.
-
Then a new window is opened up on the Web Browser to display ex1.html. You have already done this in Session 6. First of all, please check the content of the Web page and the name on the title bar to see if they are the same as those on the Web page that has been published.
At this time, please check the content of the address bar.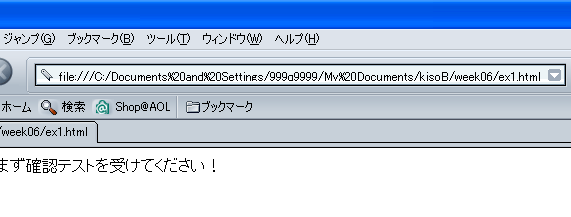
-
When you saw the published page, the content of the address bar was:
http://st.gsis.kumamoto-u.ac.jp/user-ID/ex1.html
because you entered this yourself. However, the content this time is as shown below, isn’t it?file:///C:/Documents and Settings/999q9999/My Documents/kisoB/week06/ex1.html
As shown above, whereas the URI of a published Web page which you see all the time begins with http://, when you see the HTML files located on your PC directly on the Web Browser, the URI begins with file://. The top part of the URI is called the scheme (or protocol), representing the protocol which shows via what kind of mechanism resources including file can be obtained, isn’t it? When you browse the published Web page, the scheme http:// is displayed, because you use a communication protocol called http (HyperText Transfer Protocol) to obtain the resources. On the other hand, when you directly load the resources (files) located on your PC, the scheme file:// is used, because you do not need communication via network. Therefore, while you are creating a Web page, you should always have a clear awareness of whether what you are seeing on the Web Browser is “the files located on your PC” or “the files (Web page) that have been uploaded (published) to the Web Server”, by checking the scheme part (http:// or file://).