
| URI and the Name of the File on the Server |
Check the relationship between the URI and the name of the file you uploaded.
Creating a New Folder on the Web Server and Upload to That Folder
Let us create a new folder on the WWW Server, upload an HTML file in that folder, and publish a new Web page.
Please follow the steps below to create a new folder on the WWW Server, store a file in that folder, and check the display on the Web Browser.
- Connect to the WWW Server via WinSCP
Please establish a connection to the WWW Server via WinSCP while recalling what you have learned in the previous chapters. - Specify the upload destination folder (moving to the folder at the WWW Server side)
As explained previously, the upload destination needs to be the public_html , which is a folder dedicated to Web page publishing. Therefore, please move to the public_html in the server side pane located on the right on WinSCP.
To move to the folder, double click on the folder icon as you always do on your PC. - Create a folder on the WWW Server
The HTML file which you have uploaded previously should be there in the public_html folder. However, this time let us create a folder called “w06” there. To create a new folder, all you have to do is to right click the mouse, select “New” → “Directory”, and enter the file name.
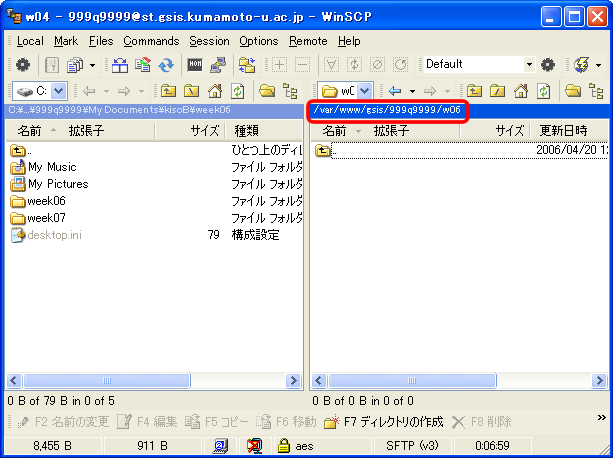
When you created the folder, let us move to the w06 folder straight away.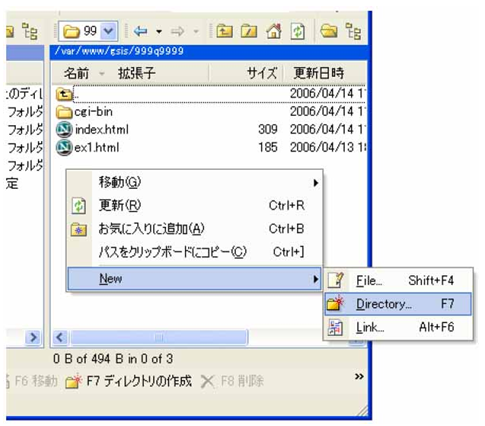
- Upload the file
Please upload “week06\ex1.html” to the folder you just moved in.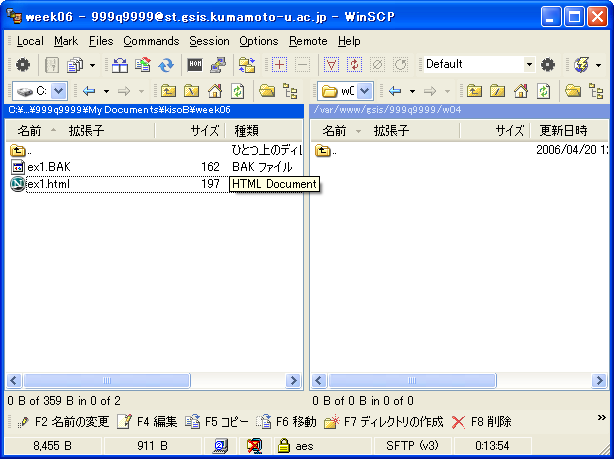


- Check the Web page you uploaded
Start up the browser, input the following URI in the address bar, then press the Enter Key、 to see if your Web page you have just uploaded is displayed there.http://st.gsis.kumamoto-u.ac.jp/user-ID/w06/ex1.html
The File Name (Path Name) on the WWW Server and the URI
In Chapter 2, after you uploaded (published) your Web page, you checked the display on the Web Browser to see if it was published successfully. Do you remember the URI you entered at that time?
http://st.gsis.kumamoto-u.ac.jp/user-ID/ex1.html
What was the name of the file you uploaded on the WWW Server at that time? To which folder did you upload it?
When we compare the path part of the URI when you uploaded the file in Chapter 2 and the name of the file/folder at that time, we can see that there is the following correspondence relationship:
| Path part of the URI | On the WWW Server | |
|---|---|---|
| Folder name | /user-ID | /public_html |
| File name | ex1.html | ex1.html |
On the other hand, how were things when you created the w06 folder on the WWW Server and published (uploaded) the Web page in the previous section? The relationship at that time was as follows, wasn’t it?
| Path part of the URI | On the WWW Server | |
|---|---|---|
| Folder name | /user-ID/w06 | /public_html/w06 |
| File name | ex1.html | ex1.html |
As you can see from this, the folder/file composition from the public_html, located in the folder (home directory) dedicated to individual users on the WWW Server becomes the path part of the URI as it is, except that “/public_html” is replaced with “/user-ID” in the path part of the URI.
Therefore, please understand that the following URI represents such resources as shown below.
http://WWW name of the WWW Server/xxxx/yyyy/zzz.html
“A file called zzz.html which is located in a folder called yyyy which is located in a special folder (public_html) dedicated to Web publishing located in the home directory (a folder exclusively used by xxxx) of the user called xxxx on a particular server specified by the name of the WWW Server”.
Special File Name: ? index.html ?
Apart from the requirement that you have to use single-byte alphanumeric characters, there is no other condition for the name of the file you upload to the WWW Server. Nevertheless, the file name “index.html” has a special meaning. The file that has this name can be accessed by just specifying the folder name which contains this file even if you do not specify the name of the file.
Please follow the steps below to see/understand what happens if you change the name of the HTML file on the WWW Server to “index.html”.
- Change the name of the file on the WWW Server
On WinSCP, please change the name of the file “/public_html/w06/ex1.html” on the WWW Server to “/public_html/w06/index.html”. The changing process is the same as the way you change the file name on Windows. Make the “public_html/w06” folder be displayed on the server pane, select “ex1.html”, right click the mouse to bring up a menu, select “Change name,” and change the name. - Check the index.html on the Web Browser
Enter the following URI in the address bar of the browser to check the file whose name you have just changed to index.html. As a matter of course, please do not forget to press the Enter key after you enter the URI.http://st.gsis.kumamoto-u.ac.jp/user-ID/w06/index.html
The result of course is exactly the same, because you only changed the file name on the server, isn’t it? - Omit the file name on the Web Browser
This time, delete the “index.html” part in the address bar of the Web Browser so that the URI becomes as follows:、http://st.gsis.kumamoto-u.ac.jp/user-ID/w06/
Leave the URI as it is and please press the Enter key. When you do this, please be careful not to delete the last “/ (slash)”.
Nothing has changed, has it? Isn’t this strange? - Checking
For the purpose of checking if the URI in which index.html is omitted is really displaying index.html, let us specify a file name which does not exist on the server.
Please add the name of the file which does not exist on the server to the address bar as shown below:http://st.gsis.kumamoto-u.ac.jp/user-ID/w06/abc.html
Then please press the Enter key.
At this stage, you delete the file name in the address bar of the Web Browser once again to bring the address bar back to the original display:
http://st.gsis.kumamoto-u.ac.jp/user-ID/w06/
then please press the Enter key。
Then, you will have the same display of the index.html again.
In other words, the file name index.html in the URI can be omitted.
Actually, if a URI finishes with “/ (slash)”, the Web Server interprets it as “the name of the file specified by the server (index.html for most servers) is omitted” and tries to display the file (i.e. index.html). Therefore, if there is no index.html file, there will be an error message “Forbidden: You don’t have permission …” which means that it is an error because the server cannot access the file, as it is not authorized to do so. (Actually the truth is nothing more than the fact that there is no such file as index.htm)
To try this, please click the URI below to see what happens. An error message will be displayed, because there is no index.htm file in or below “~sugitani/”.