
| Upload via FTP Client |
Learn how to publish a Web page by performing initial settings for FTP client software, creating dedicated folders on the WWW Server, and sending (uploading) the Web page files such as HTML file you created to the WWW Server.
Studying this chapter would help you understand how the students of “Introduction to Information Technology A/B” use FTP to upload their files.
FFFTP and Initial Settings of FFFTP
Although there are a number of client software packages you can use for a protocol (communication procedure) called FTP (File Transfer Protocol), in “Introduction to Information Technology B” we use the software called FFFTP.
The FFFTP is an FTP client program developed by Mr. Sota and is available as free software (http://www2.biglobe.ne.jp/~sota/ffftp.html). This is sophisticated software which is easy to use and widely used on Windows family OSs.
Please follow the steps below to perform the initial settings of FFFTP
By performing these settings, uploading the Web page related files becomes easy.
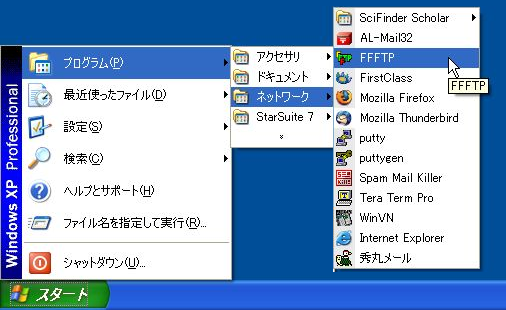
- Start up the FFFTP
Please start up the FFFTP by taking the steps as follows: Start button → Program → Network → FFFTP
- Initial settings including FFFTP server information
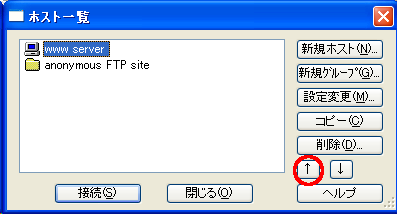
- When you start up the FFFTP, the Host List dialogue box should be displayed in front as shown below.
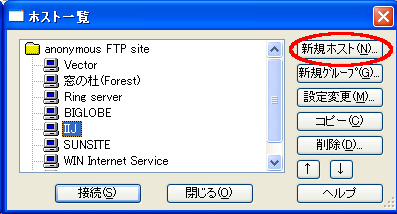
- Click on here, read through the explanation in the table below, and set up the host and other settings while referring to the images.
(However, please do not click button yet, even after you have completed the settings.)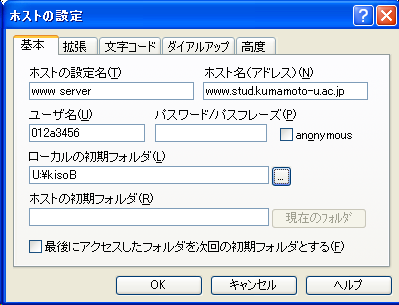
Item Value Supplementary notes Setting name of the host www server Give the host any name so that you can easily recognize the server. Host name www.stud.kumamoto-u.ac.jp Normally, the FTP Server address should be entered here. However, here, please specify www.stud.kumamoto-u.ac.jp, because the WWW Server used in this course also provides FTP service (i.e., functions as an FTP Server as well). For many providers etc, the name of the WWW Server would be different from that of the FTP Server. User name Log-on user name to the Lab PC Normally the log-in user name for the FTP Server should be entered here. However, here, please enter your log-in user name for the WWW Server, because the WWW Server used in this course also provides FTP service. This is the same log-in user name you use when you log-on to the Lab PC. Password (Do not put anything here) Password must be entered every time you log in, for the sake of enhanced security. This is the same password you use when you log-on to the Lab PC. Local default folder U:\kisoB Specify the default folder at the PC (client) side. In this case, please specify kisoB (U:\kisoB) in My Documents. When you are setting up this item, click  the folder icon located at the right hand side to select the folder.
 -
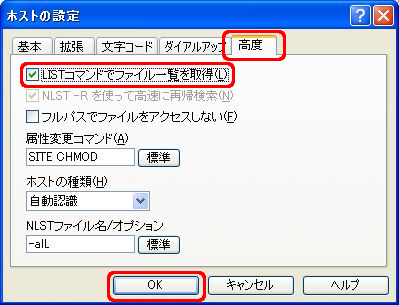
After that, click the “Higher level” tab and check “Obtain the file list using LIST command”.
When you have finished the setup, click
.
-
When you are back in the original dialogue box, clickas shown in the image below a few times so that the host you have just set up can be moved up to the topmost position. If you do this, the WWW Server you use is displayed at the top of the list as shown in the image below. From the next time on, whenever you want to connect to the WWW Server via FFFTP, all you have to do is to double click on this icon on top of the list. (You still need to enter your password, though.)
(Note) By going through the steps above, you set up the FTP Server which is the upload destination. During that operation, you might have noticed that there are other servers which have already been registered. These servers are called anonymous FTP Servers. You usually use these servers to download free software etc., although you cannot do any uploading, by entering “anonymous” as a user name and using your email address as a password. See elsewhere for details.
- When you start up the FFFTP, the Host List dialogue box should be displayed in front as shown below.
Connection to the WWW Server via FTP
Please follow the steps below to make a connection to the WWW Server via FFFTP.
Once you are connected, you can create, copy, delete, etc. the files and folders on the WWW Server via network as if they were located on the same PC as you are operating.
In the Host List dialogue box, double click the FTP Server name (www.server) which you have already set up or press button after selecting the FTP Server name to bring up the password input dialogue.
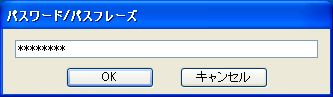
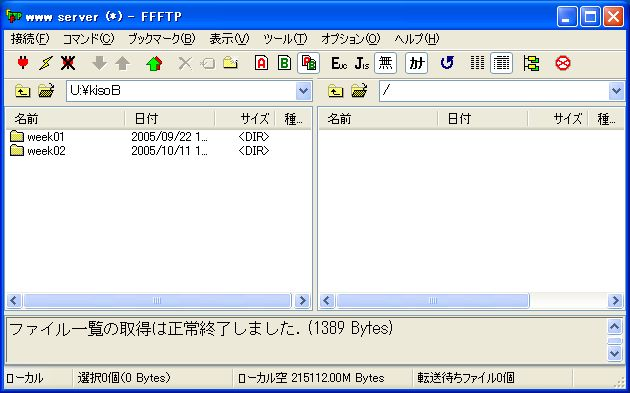
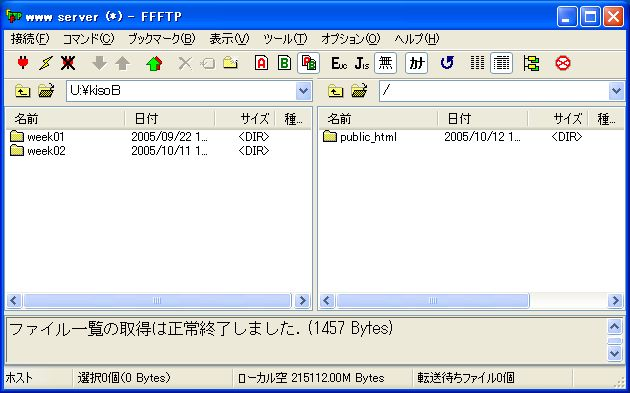
When you input the same password as you use when you log-on to the PC there, the connection to the server will be established and you have a display as the image shown below. On this FFFTP window, the files and folders that are being stored on the local PC are displayed in the left window (called a “pane”) and those being stored at the server side are displayed in the right pane.
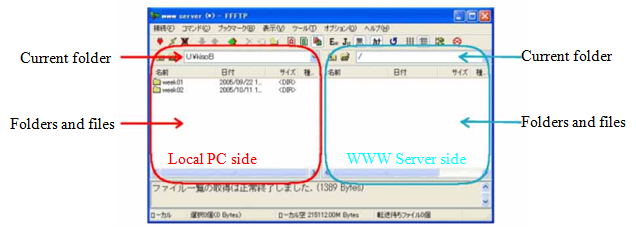
At this stage, if you right click a file or a folder in either pane, you can do all the file operations you have been doing on your PC, including copying, pasting, deleting, changing names, and creating a new folder.
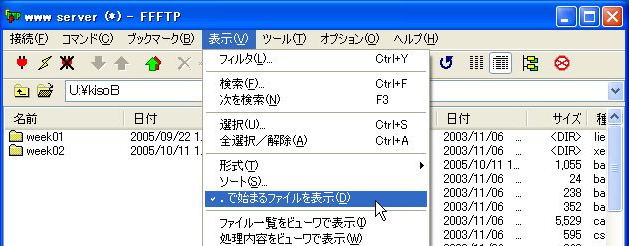
By the way, some people might have so-called dot files displayed on the server side pane on the right as shown below, dot files being files and folders in which the file/folder name is always preceded by a period. These files are used for various default settings which normally you do not want to edit. Therefore, let us hide these dot files if you have them in the window.
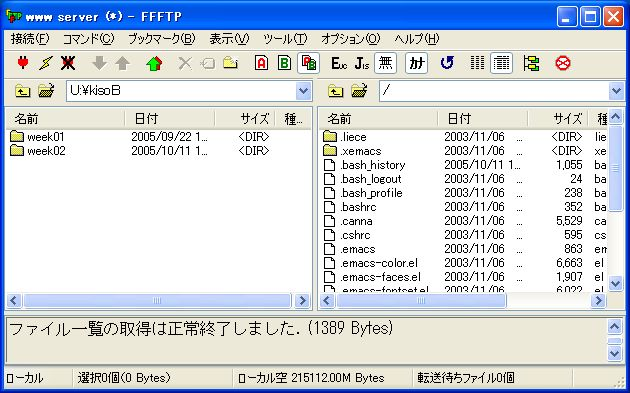
You can do this by deselecting “Display the file with a name starting from .” from the “View menu”. To deselect, just select the menu mentioned above. (If you select it again, then the item is reselected.)

Creating a Folder Dedicated to Web Page Storage on the WWW Server - public_html -
Please follow the steps below to create “public_html”, a folder dedicated to Web page storage, on the WWW Server via FFFTP.
Web page related files cannot be seen on a Web Browser unless you upload (store) them in this folder. In other words, unless you do that, your Web page is not published.
The server side folder (or directory) immediately after you have established a connection to the WWW Server via FFFTP is called the home directory However, the place you see when accessed by the Web Browser is usually specified to be a different place. For the WWW Server you use, it is set to be the folder one level further down from the home directory called public_html . However, this folder does not exist initially. Therefore, you have to create this folder. Once you have created it, you do not need to do it again.
Then let us create it now.
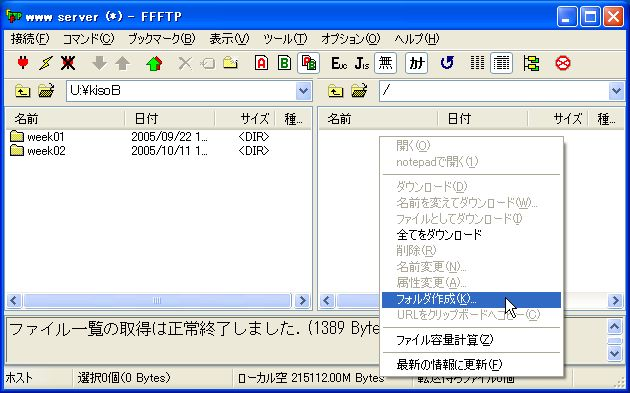
- Bring up the sub menu as shown in the image below by clicking the right button of the mouse in the area where files and folders are displayed on the server side pane on the right. Select “Create folder (K) …” from the sub menu.
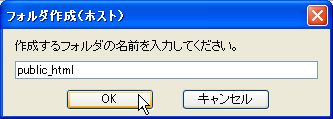
- When a dialogue box is displayed as shown below, input
public_html and click “”.
 (Caution)
Since the name of the folder dedicated for Web pages is defined by the WWW Server, your Web page will not be published if you input a wrong file name. The following examples show some common mistakes:- public html (A white space is inserted between public and html)
- public-html (A hyphen is inserted between public and html)
- public.html (Period is inserted between public and html)
- pubric_html (Wrong spelling: pubric should be public)
- If you do this, the public_html folder is created on the server pane on the right.
Uploading the Web Page Related Files
As you have completed the preparation work for uploading (this means “copying the files on your PC to the server”, doesn’t it?) your files to the WWW Server in the previous section, all you have to do now is to actually upload them.
[Notification and words of warning concerning the WWW Server for practice]
A WWW Server (www.stud.kumamoto-u.ac.jp) is made available for practice to be used by students enrolled at Kumamoto University. Also, in Introduction to Information Technology B, students are required to use this WWW Server to practice creating and publishing their Web pages. By the way, as this is a server for practice, it is set up in such a way that access is only allowed via network within the university. Therefore, you can neither browse the Web page you uploaded/published during Introduction to Information Technology course on your PC which is connected to the Internet, nor can you directly upload files for the Web page from your PC at home.
However, although this is only a WWW Server for practice, once you upload your page, anyone can access it from any PC on the network in the university. If the Web page related files violate the copyright law, what you have done constitutes an illegal act. Moreover, you will never know who is going to come and see it when you post personal information. So, please practice extra caution when you upload your files (and when you create the Web page related files).
As upload means to copy a file from one machine to another, you follow the steps below to do that on FFFTP.
- Specify the upload (copying) destination folder.
- Select the source file to be uploaded (copied).
- Implement uploading (copying).
Step 1 can be done after step 2. However, I would recommend you to specify/confirm the destination first, and then upload files because, through my experience doing this practice, I know that students tend to forget to specify the upload destination.
Please follow the steps below to upload the HTML files via FFFTP to the WWW Server.
Please never make a mistake when you specify the upload destination.
- Connect to the Web Server via FFFTP
If you are already connected to the WWW Server via FFFTP, you will be all right. However, if you have not started up FFFTP, or even if you have FFFTP up and running you have no established connection to the WWW Server, then please refer to the previous chapter to establish a connection to the WWW Server. - Specify the upload destination folder (moving to the destination folder at the server side)
As has been explained above, the upload destination must be public_html , which is the special folder dedicated for Web page publishing.
Therefore, you are required to move to public_html on the server side pane located on the right hand side of the FFFTP window. To move to the folder, all you have to do is to double click on the folder icon as you have been doing all the time. Let us double click on the icon displayed as public_html.
Then, the folder display at the top of the server pane on the right becomes /public_html.However, as no files have been copied to the public_html folder yet, the pane is empty.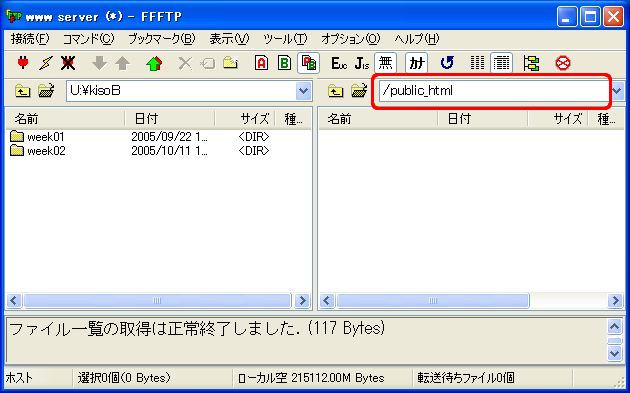
- Select the source file to be uploaded (copied)
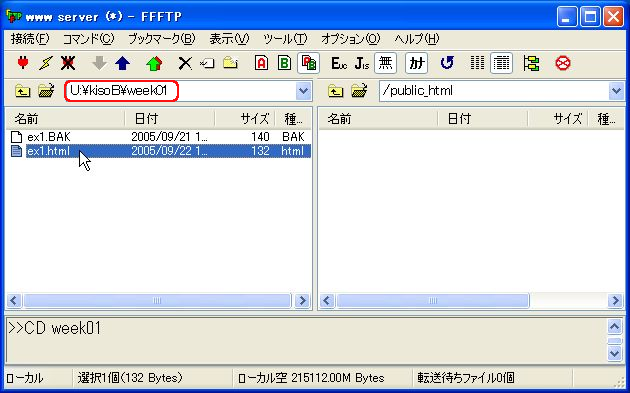
Next, please specify on your PC the relevant files for the Web page you created; i.e., the files you want to upload (publish) to the WWW Server. All you have to do is to move to the required folder by double clicking on the folder icon and click on the file in the same manner as you have done at the server side (or in fact as you have been doing all the time). However, as the objects of the operation this time are the folders and files located at the PC side (sometimes called “local side” as opposed to the server which is located at the other end of the network), you must do these operations in the left pane.
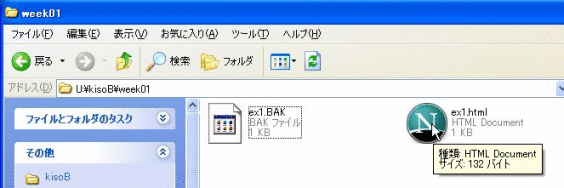
As you are supposed to upload U:\kisoB\week01\ex1.html this time, double click the icon of the week01 folder (please make sure that the folder display at the top part of the left pane is U:\kisoB\week01 ), then click ( not double click) on the ex1.html icon to select it.
- Implement upload
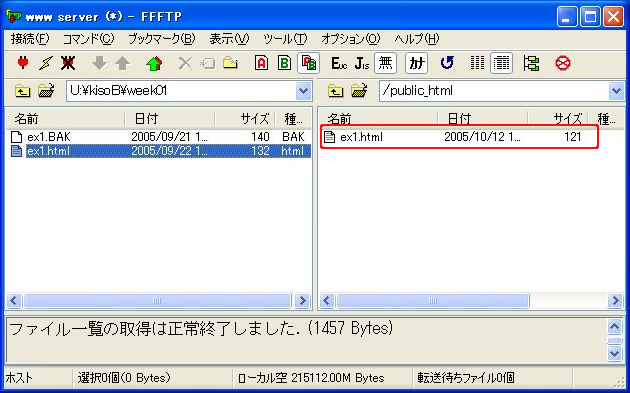
Check if the server pane on the right is /public_html and the file to be uploaded (ex1.html) is selected on the local pane on the left, then click on the upload icon.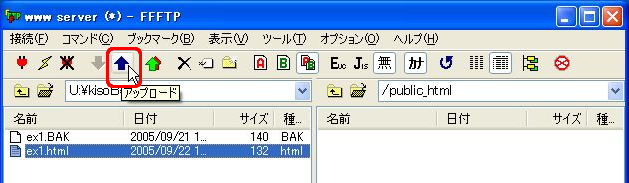
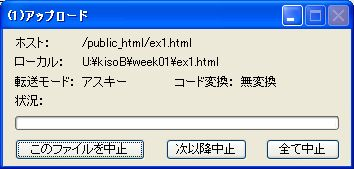
When you click the upload icon, the following dialogue will be displayed to show you that the upload is in progress. However, the size of the file this time is so small that the dialogue would be displayed for only a split second before the upload is completed.
When the upload is completed, ex1.html, which has been uploaded to the server, will be displayed in the right pane. Upload is now completed.
Checking the Display on the Web Browser
Let us check if the Web page you created has been successfully published on the WWW Server as required. Sometimes, even if the Web page consists of just one HTML file, you cannot display the file properly because of the problems associated with the location (folder) you stored the file or the file name.
Please follow the steps below to see if the HTML files you uploaded are displayed correctly on the Web Browser (i.e., whether they have been successfully published).
If they are not displayed correctly, please work out the reason for the problem so that you can deal with the problem.
- On Netscape, from “file menu” select “New” → “Navigator window” to open another Netscape window.
-
On the newly opened Netscape window, please input the following URI in the address bar. Then press the Enter Key 、
to see if the Web page which you have just uploaded can be displayed.
http://www.stud.kumamoto-u.ac.jp/~log-on ID to the PC/ex1.html
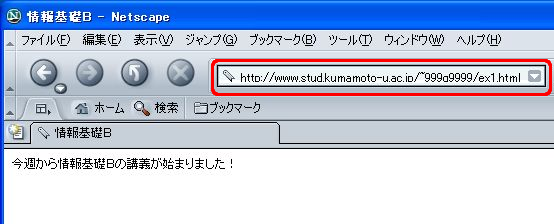
In the image above, the log-on ID is 999q9999.
(Note)
Please be aware that the log-on ID is preceded by a “~ (tilde)”. On the Lab PC, you can input “~ (tilde)” by pressing the key which is marked with Hiragana “he” while pressing down the shift key.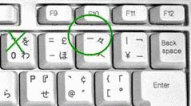
If you could not display the page correctly, please check the following items again.
Error message Cause Things to be checked Cannot find … , please check the domain name again Entering a wrong server name in the URI Check if the server part of the URI you entered in the address bar of Netscape is http://www.stud.kumamoto-u.ac.jp. Not Found
The requested URL /~xxxx/yyy.html was not found on this server.Entering a wrong path name in the URI Check the path part of the URI you entered in the address bar of Netscape to see if it consists of tilde (~), log-on ID (xxxxx) and file name (yyy.html). As above Upload to a wrong folder Check if the destination folder you uploaded files via FFFTP is public_html or located below that level.。 As above Uploaded a wrong file Check if the file you uploaded via FFFTP has the same file name as the one in the URI which you entered in the address bar.
Please follow the steps below to understand the difference between the Web page which has been published and the Web page on your PC (which has not been published yet).
Please recognize the difference between the display on the Web Browser of the HTML file which has been uploaded and the display on the Web Browser of the HTML file which is located on you PC so that you can tell that what you are seeing now is either the one or the other.
-
From My Documents, move to U:\kisoB\week01\ and double click the ex1.html icon.
-
Then a new Netscape window is opened up to display ex1.html, isn’t it? You have already done this in week 1. First of all, please check the content of the Web page and the name on the title bar to see if they are the same as those on the Web page that has been published. (Normally when you edit HTML files, you do this in reverse order; i.e., after checking the file on the PC a number of times, file…).
At this time, please check the content of the address bar.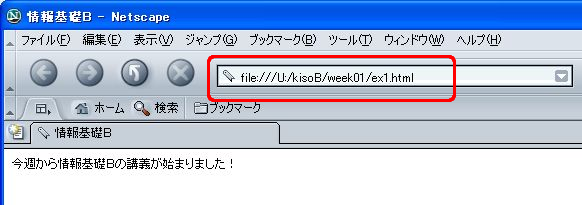
-
When you were seeing the published page, the content of the address bar was:
http://www.stud.kumamoto-u.ac.jp/~Log-on ID to the PC/ex1.html
because you entered it yourself. However, the content this time is as shown below, isn’t it?file:///U:/kisoB/week01/ex1.html
As shown above, whereas the URI of a published Web page which you see all the time begins with http://, when you see the HTML files located on your PC directly on the Web Browser, the URI begins with file://. The top part of the URI is called the scheme (or protocol), representing the protocol which shows via what kind of mechanism resources including file can be obtained, isn’t it? When you browse the published Web page, the scheme http:// is displayed, because you use a communication protocol called http (HyperText Transfer Protocol) to obtain the resources. On the other hand, when you directly load the resources (files) located on your PC, the scheme file:// is used, because you do not need communication via network. Therefore, while you are creating a Web page, you should always have a clear awareness of whether what you are seeing on the Web Browser is “the files located on your PC” or “the files (Web page) that have been uploaded (published) to the Web Server”, by checking the scheme part (http:// or file://スキーム部分 (http:// or file://) .