
| Inserting Images |
[The purpose of this section]
Learn how to insert images such as ones created by other applications into StarSuite Draw.
Learn how to insert images such as ones created by other applications into StarSuite Draw.
Inserting Images
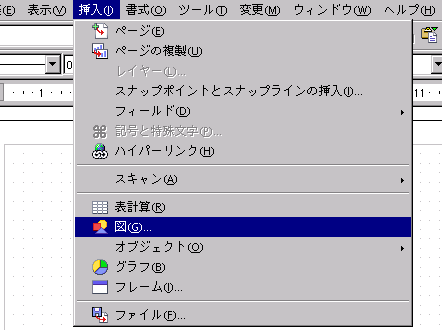
Select [Image] form the [Insert] menu and select the file you want to insert.
However, you can only insert limited image formats including JEG, GIF, PNG and some other formats. Therefore you cannot use an XCF format image which is the original format of GIMP. If you want to use an image created by GIMP in Draw (as well as in other software), you have to save it in the XCF format first and then save the file in an image format such as JPEG using the [Save As] command as below.
However, you can only insert limited image formats including JEG, GIF, PNG and some other formats. Therefore you cannot use an XCF format image which is the original format of GIMP. If you want to use an image created by GIMP in Draw (as well as in other software), you have to save it in the XCF format first and then save the file in an image format such as JPEG using the [Save As] command as below.
- To insert an image, select [Image] from the [Insert] menu in Draw and specify the image file to be inserted.
Modifying an Inserted Image
The size of the image you have inserted can be changed by dragging a corner of the image. If you want to enlarge or shrink the image while maintaining the aspect ratio, drag it while pressing the [Shift] key.
You can adjust the color up to a certain level using the object bar.

You can adjust the color up to a certain level using the object bar.
Using Gallery
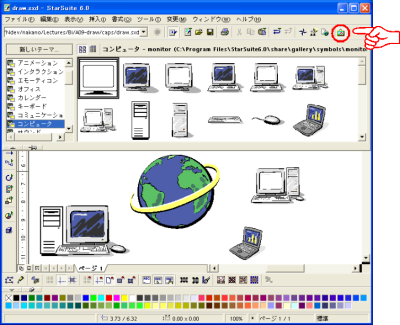
Using the [Gallery] icon on the right edge of the Function bar, you can take advantage of various prepared image parts. You can simply select the image you want to use and drag it into the page. Moreover, the size of the image can be changed by dragging one corner (if you do not want to change its aspect ratio, drag the corner while pressing the [Shift] key). Below is an example of an image created using several [Computer] parts.
* Please be aware that in StarSuite 8, the [Gallery] icon is not located in the same location as the figure below. (It is located on the upper line of the bottom status bar.)
* Please be aware that in StarSuite 8, the [Gallery] icon is not located in the same location as the figure below. (It is located on the upper line of the bottom status bar.)